Showing posts with label Brownies/Bars. Show all posts

Friday, January 6, 2012

Cookies N' Cream Brownies

So for awhile now, I've been craving a rich and chocolatey brownie. I also happened to get my hands on The Taste of Home Baking Book. This book has a great selection of brownie recipes which I can't wait to try. As I flipped through, my eyes landed on a particular recipe since it has one of my favorite ingredients: Oreo Cookies. To be honest, I think that you simply can't go wrong with anything that has Oreos because they are just so darn good. My mind for the first choice was made up. The good news is that the brownies turned out great! They are moist and not too sweet. On the downside, I didn't really taste any Oreo flavor. So if I make these again, I will definitely be adding an Oreo topping of some sort, which will also add a nice touch.


Ingredients:
  • -1 package (8 ounces) cream cheese, softened
  • -1/4 cup sugar
  • -1 egg
  • -1/2 teaspoon vanilla extract

  • BROWNIE LAYER:
  • -1/2 cup butter, melted
  • -1/2 cup sugar
  • -1/2 cup packed brown sugar
  • -1/2 cup baking cocoa
  • -2 eggs
  • -1 teaspoon vanilla extract
  • -1/2 cup all-purpose flour
  • -1 teaspoon baking powder
  • -12 cream-filled chocolate sandwich cookies, crushed

Directions:

  • 1. In a small bowl, beat the cream cheese, sugar, egg and vanilla until smooth; set aside.
  • Tip: Make sure you scrape down the bowl while beating the cream cheese mixture AND the brownie mixture. You don't want any lumps leftover inside each of the mixtures before you pour them into the pan. At the same time, don't beat the mixtures too much because it can ruin the texture of the brownie. 


2. For brownie layer, combine the butter, sugars and cocoa in a large bowl. 


  • 3. Beat in eggs.


4. Combine flour and baking powder; gradually add to cocoa mixture. 


5. Stir in cookie crumbs.


6. Pour into a greased 11-in. x 7-in. baking pan.


  • 7. Spoon cream cheese mixture over batter; cut through batter with a knife to swirl. 
  • Tip: Don't cut through the batters too much because you don't want to mix up the batters completely. The layers should stay separate - you just want to create a swirl effect for design.


  • 8. Bake at 350° for 25-30 minutes or until a toothpick inserted near the center comes out with moist crumbs. 


9. Cool completely on a wire rack. Cut into bars. Store in the refrigerator.

Tuesday, April 6, 2010

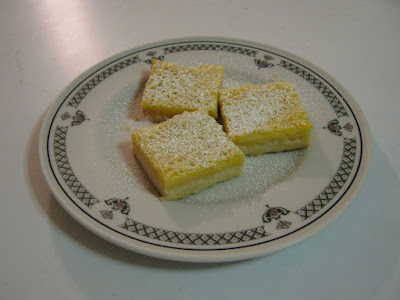
Lemon Bars

This recipe is one I've been meaning to make for a very long time. It all started when my dad brought home some lemon bars that he bought at work from a co-worker. After he got a new job, he wasn't able to buy the bars anymore. Since then, he has repeatedly asked me to make them for him. So finally, I got myself to make these bars to make my dad happy.

At first, I attempted to make Meyer Lemon Squares from my beloved book Williams-Sonoma Essentials of Baking. For the first time, I am very sad to say, the book failed me. I literally had to throw out the whole pan of squares. Let me clarify - it wasn't that I messed up. In fact, the bars looked pretty good and I followed everything correctly. But the lemon curd tasted so horrible with its raw egg-like aftertaste (probably due to the many eggs the recipe contains). To say the least, I was pretty angry and disappointed because it was a lot of work making that nasty lemon curd.

Now my personality is such, that I hate to give up. If something goes wrong, I am determined to make it right. And so I looked for another recipe. I looked in my other books and I even looked online. Ultimately, I decided on a recipe from my new favorite book, Cookies: 1,001 Mouthwatering Recipes from Around the World. I was not disappointed! My whole family (including me) LOVED the lemon bars. And best of all, they are pretty easy to make.

The crust is DELICIOUS with the taste of buttery shortbread, and the creamy filling has just the right amount of lemon flavor. The perfect dessert for spring!


Ingredients:
  • 1 1/4 cups all-purpose flour
  • 1/3 cup confectioners'/icing sugar
  • 1/8 tsp salt
  • 1/2 cup (1 stick) cold butter, cut up
Filling-
  •  1/3 cup all-purpose flour
  • 1/2 tsp baking powder
  • 4 large eggs
  • 1 1/2 cup powdered sugar
  • Grated zest and juice from 3 lemons
  • 2 tbsp confectioners'/icing sugar, to dust
1. Preheat the oven to 325 degrees F. Butter a 9-inch square baking pan.

2. Sift the flour, confectioners' sugar, and salt, and cut in the cold butter (use a food processor!) until the mixture resembles fine crumbs.


3. Firmly press the dough into the prepared pan. Bake for 15-20 minutes, or until lightly brown. Cool the base completely in the pan, and lower the oven temperature to 300 degrees F.


4. For the filling, sift the flour and baking powder into a bowl. Using a mixer, beat the egg and powdered sugar in another bowl at high speed until pale and thick.


5. Stir in the lemon juice and lemon zest. (Make sure to strain the lemon juice before pouring it in.) Add the dry ingredients and whisk until incorporated.


6. Pour the filling over the prepared base, and bake for 30-40 minutes, or until the filling is set but still a little wobbly in the center. (The mixture will continue to cook after it has been taken out of the oven.)


7. Cool completely in the pan, and dust with confectioners' sugar and cut into bars. (It will keep in the fridge for about 4 days, and makes about 16-25 bars.)

Monday, February 15, 2010

Nanaimo Bars

For many of you, the first thing you're probably thinking as you read the title is "What the heck is a Nanaimo Bar?" The first time I came across it was, of course, in the lovely book I mentioned in my last post called Cookies: 1,001 Mouthwatering Recipes From Around The World. As the title clearly indicates, there are recipes in the book from all over the world, and this particular recipe was in the section called "Bars and Brownies." As you're probably still wondering, the recipe is named after the city Nanaimo in British Columbia, Canada. I won't go too much into detail, but if' you're curious about the history and background of this delicious bar, you can visit this link: Nanaimo Bars. The link belongs to a website dedicated to the city of Nanaimo. And although it wasn't intentional and I don't follow the Olympics, I guess it would be fitting to dedicate this post to the Winter Olympics taking place in Vancouver.

I would also like to mention that the website also contains an original recipe for Nanaimo Bars. For the bars I made, the recipe that I ended up following is a combination of the one from the baking book I have, and the one on the website. If you want to make the original, you should know that it doesn't require any baking.

As for how the bars turned out, they were very rich and scrumptious, especially because of the chocolate layer on top. I wanted to add a little touch of my own, so I sprinkled some toasted pecans and toasted coconut on top, which made it look nicer. Also, the recipe in the baking book uses pecans in the first layer, whereas the traditional bars have almonds. And anyway, I much prefer pecans =) Lastly, the second layer traditionally contains custard powder, which I believe is not readily available in places in America. I actually got my Bird's Custard Powder from England. But if you don't have it, no problem! You can substitute with vanilla or vanilla pudding mix. I would say that if you don't have a sweet tooth, this is NOT for you because it's very SWEET. I would probably put a little less sugar in the middle (vanilla) layer next time. Also, the bars are not as thick as they would usually be since I used a bigger pan (13x9-inches as opposed to 8x8-inches) since that is what the recipe in the baking book indicated. But it's probably a good thing that the bars are thinner because you certainly can't (and shouldn't) eat too much of this stuff at one time! As the book describes them perfectly - they are "luxurious."


Ingredients:
First layer -
  • 1 large egg
  • 1/4 cup granulated sugar
  • 1/2 cup (1 stick) unsalted butter, softened
  • 1 tsp vanilla
  • 3 tbsp unsweetened cocoa powder
  • 2 cups graham cracker crumbs
  • 1 cup shredded coconut
  • 1/2 cup finely chopped pecans
Second layer -
  • 1/2 cup unsalted butter
  • 2 tbsp and 2 tsp whipping cream
  • 2 cups confectioner's/icing sugar
  • 2 tbsp vanilla custard powder or 1 tsp vanilla
Third layer -
  • 8 oz semisweet chocolate
  • 3 tbsp unsalted butter
  • Finely chopped, toasted, pecans and toasted coconut (optional)
1. Preheat the oven to 350 degrees F. Butter a 13x9-inch baking pan. Toast the pecans in the oven for a few minutes after placing them on a foil-covered baking tray.


2. For the first layer, beat the egg and sugar using a mixer until the mixture is pale and thick.


3. Using a wooden spoon, stir in the butter, vanilla, cocoa, graham cracker crumbs, coconut, and pecans.

 
^ Sorry, I do realize that looks kind of nasty.

4. Firmly press the mixture into the prepared pan to form a smooth, even layer. Bake for 10-15 minutes, or until firm to the touch. Let cool completely.


5. For the second layer, beat the butter, cream, icing sugar, and custard powder/ vanilla using a mixer at high speed until it is light and well blended. Spread the mixture over the first layer and put in the freezer for 10 minutes.


6. For the top layer, melt the chocolate and butter in a double boiler over barely simmering water. Spread over the second layer. (As I said before, I sprinkled the finely chopped, toasted pecans and toasted coconut as a topping and for decoration. You certainly don't have to.) Refrigerate for at least 1 hour, or until set. Cut into bars. The bars will keep for at least 3 days in the refrigerator.


Saturday, June 6, 2009

Marbled Brownies

So this is by far one of my most favorite brownie recipes. The combination of the cream cheese flavored white batter and the chocolate flavored batter with the nuts thrown in is irresistible. To top it all off, it is moist. Personally, I'm not a huge fan of dry, cake-like brownies. I would say that this brownie tastes perfect as a midnight snack with a tall glass of milk - that's how I like it anyway. 

(Makes 24)

Ingredients:
  • 8 1-oz squares semi-sweet chocolate 
  • 6 tbsp butter 
  • 4 eggs 
  • 1 1/2 cups sugar 
  • 1 cup flour 
  • 1/2 tsp salt 
  • 1 tsp baking powder 
  • 2 tsp vanilla essence 
  • 1 cup walnuts, chopped
For the plain batter:
  • 4 tbsp butter 
  • 6 oz cream cheese 
  • 1/2 cup sugar 
  • 2 eggs 
  • 2 tbsp flour 
  • 1 tsp vanilla essence

1. Preheat the oven to 360 degrees F. Line the bottom and sides of a 13 by 9-inch pan with wax paper and grease.

2. Melt the chocolate and butter over very low heat, stirring constantly. Set aside to cool.

3. Meanwhile, beat the eggs until light and fluffy. Gradually add the sugar and continue to beat until blended. Sift over the flour, salt, and baking powder and fold to combine.


4. Stir in the cooled chocolate mixture. Add the vanilla and the walnuts. Measure and set aside 2 cups of the chocolate batter.


5. For the plain batter, cream the butter and cream cheese with an electric mixer.


6. Add the sugar, and continue beating until blended. Beat in the eggs, flour, and vanilla.

7. Spread the unmeasured chocolate batter in pan. Pour over the cream cheese mixture. Drop spoonfuls of the reserved chocolate batter on top. With a metal spatula, swirl the mixutre to marble.


8. Bake until just set, 35-40 minutes. Unmold when cool and cut into squares for serving.


Sunday, June 29, 2008

Classic Dark Chocolate Brownies

Here's a recipe that's not too hard for those of you out there who are intimidated by baking. This recipe probably makes one of the best brownies I have EVER tasted...they are so chocolatey, moist, and soft, and the crispy crust is the perfect touch. There's almost nothing like eating one of these when they are warm with a glass of cold milk! Or even better, try it with a scoop of vanilla ice cream with chocolate or caramel syrup drizzled over the top.

Note: This recipe is from one of my favorite books - Williams-Sonoma Essentials of Baking

Ingredients:

  • 6 oz unsweetened chocolate, chopped
  • ¾ cup (6 oz/185 g) unsalted butter, cut into 3/4 –inch pieces
  • 3 large eggs
  • 1 ¾ cups sugar
  • ¼ tsp salt
  • 2 tsp vanilla essence
  • 1 cup plus 2 tbsp all-purpose (plain flour)

1. Position a rack in the middle of the oven, and preheat to 350 degrees F. Butter an 8-inch square baking pan.

2. Place the chocolate and butter in the top of a double boiler placed over (not touching) barely simmering water. Heat, stirring often, until the butter and chocolate melt. Remove from over the water and set aside to cool slightly.

(Note: Remember, NEVER melt chocolate in a pot directly over the stove. If you don't have a double boiler, use 2 pots. The one on the bottom should be slightly bigger than the one holding the chocolate. Fill the bottom pot with at least 1 inch of water and let it come to a simmer. Place the smaller pot holding the chocolate, over the bottom pot. The steam from the simmering water below will melt the chocolate in a way that it won't burn.)

3. In a large bowl, whisk together the eggs, sugar, salt, and vanilla until blended. Whisk in the chocolate mixture until blended.


4. Sprinkle all of the flour over the mixture and whisk slowly just until blended. Pour the batter into the prepared pan, spreading it evenly with a rubber spatula.


5. Bake until a toothpick inserted into the center come out almost clean or with a few moist crumbs clinging to it, 35-40 minutes. Be careful not to overbake. Transfer to a wire rack and let cool completely.


Note: In case you notice a couple of holes in the brownie below, it's from me poking the toothpick in there to see if it was done =)

6. Using a large, sharp knife, cut into 2-inch squares. Store in an airtight container at room temperature for up to 3 days.